It used to be that beautiful professional nail looks and effects could only be achieved by a visit to your local nail salon. Thankfully nowadays with innovative products, tools and tutorials available, anyone wanting to know how to do french tips at home can get the look easily and at an affordable price.
The term "French tip nails" originated from the French manicure technique, which was popularized in the 1970s. The style began involving painting the tips of the nails white. However, over time the tip color has evolved to include any shade, while leaving the rest of the nail bed natural or lightly polished.
It is called "French" because it was believed to have been created by French nail technicians. The French manicure became a classic and timeless look, hence the name "French tip nails" stuck.
Disclosure: I may receive affiliate compensation for some of the links below at no cost to you if you decide to make a purchase. You can read my affiliate disclosure in my privacy policy.
Popular Ways of How to Do French Tips at Home
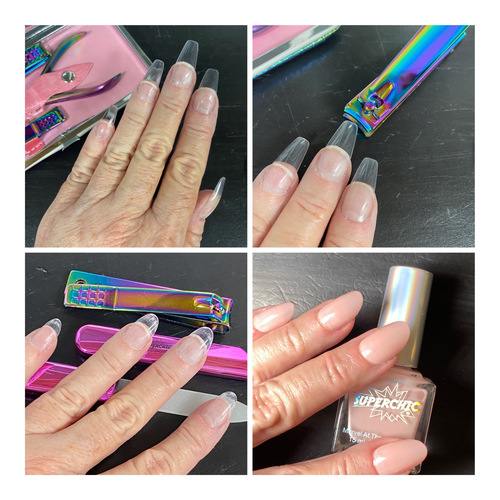
There are several popular methods of how to do French tips at home, some being simpler than others. Each method will depend on your own natural nail length, need for artificial nail extensions, preference and experience. Artificial nail extensions may include simple Press On Nails, glue-on nail tips with resin and dip overlay or sculptured acrylic.

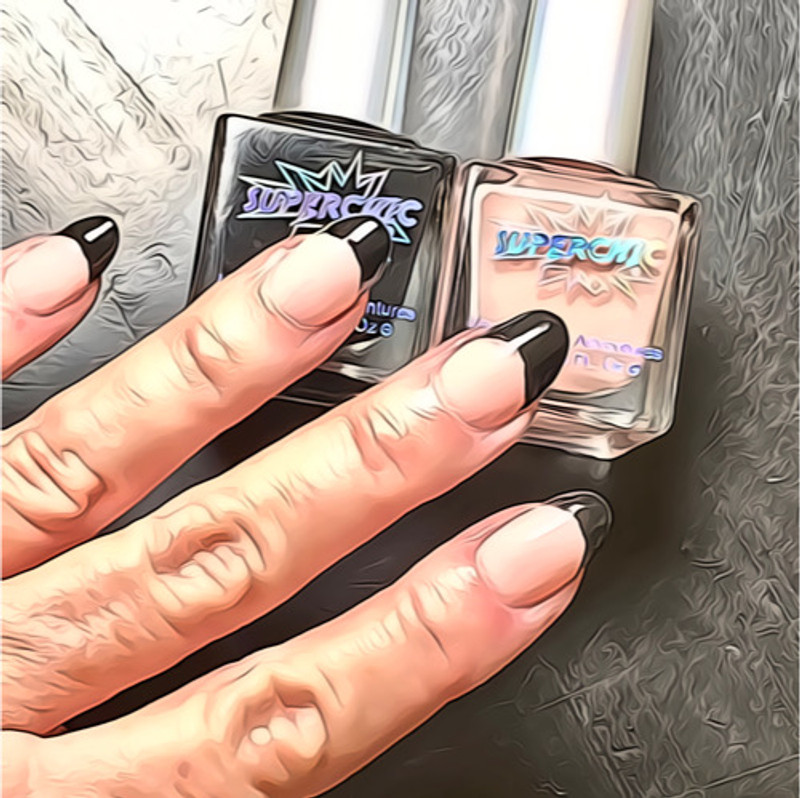
Photo Credit: @Yvonneand5 / SuperChic brand: Second Star Right Till Morning nail polish
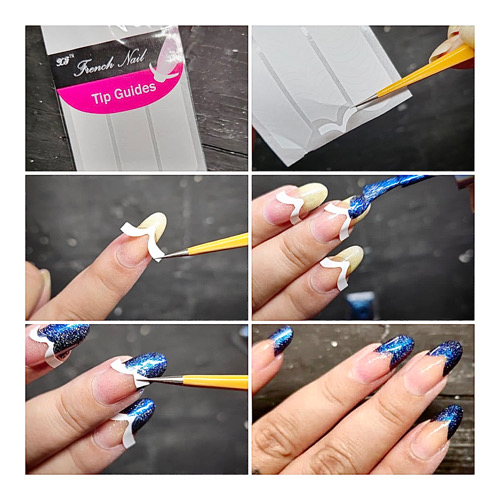
- Simple painting: This method involves using regular nail polish to paint the tips of the nails with a white, light or any virtually any colored polish. You can achieve this look by using a steady hand or using guides, stickers or a clear jelly stamper tool to create clean and precise lines. This painted method can be used on both natural and artificial nails.
- Pre-designed French tip nails: If you have short nails and need nail tip extensions for length, this is by far the easiest way to do French tip nails at home. By opting for a design pack in the color, shape and length that you love, you will skip all the painting, curing, dipping and sculpting!
- Gel system: The gel system involves using gel nail polish and a UV/LED lamp for curing. After applying a gel base coat, a white or colored gel polish is used to create the French tip. The polish is cured under the lamp, resulting in a long-lasting and glossy finish. This gel system can be used over natural nails as well as artificial nails.
- Dip system: The dip system, also known as the SNS (Signature Nail Systems) method, uses a combination of resin and colored powder. After prepping the nail bed lightly with a fine buffer and dehydrator to remove oils, the nail tip is dipped into a white or colored powder to create the French tip. The excess powder is brushed off. The remaining nail is applied with resin and dipped once again, but into a clear powder to achieve a natural look. Sealant or top coat is applied to secure the design.
- Acrylic system: The acrylic system involves using a combination of liquid monomer and acrylic powder to create a durable and strong nail extension. To achieve French tip nails, a white or colored acrylic powder is used to sculpt the tip of the nail. The acrylic is shaped and filed to create a natural-looking French tip.
These methods offer different benefits and results, so choose the one that suits your preferences and skill level.
DIY French Tips at Home: Best Money Saving Method
The best money saving system for at-home DIY French tip nails is simple painting using any favorite nail polish from your existing rack of colors. This method requires minimal tools and is beginner-friendly. All you need is a steady hand or some guides, stickers or clear jelly stamper to help create a clean and precise line for the French tip.
Here's a step-by-step guide for creating French tip nails using regular nail polish:
- Start by preparing your nails: Cut and file your nails to your desired length and shape. Push back your cuticles and ensure your nails are clean and dry. (Apply nail tips is desired).

- Apply a base coat: Apply a clear base coat to protect your natural nails and provide a smooth surface for the polish to adhere to. Allow it to dry completely.
- Choose your nail polish colors: Select a light or actually any colored nail polish of choice for the French tip and a clear or neutral shade for the rest of the nail. Traditionally, a white polish is used for the French tip, but you can experiment with other colors too for a unique or fashion color-coordinated look!
- Apply the clear or neutral polish: Start by applying a clear or sheer neutral shade of polish to your nails. This will create a clean and polished look. Allow it to dry completely.
- Apply the colored polish to the tips: Using a steady hand, carefully paint the tips of your nails with the colored polish. If you find it difficult to paint a straight line, you can use guides, stickers or a stamper positioned at the tips of your nails to create a clean edge. Allow it to dry completely.
![]()
![]()
- Apply a top coat: Finish off your French tip nails by applying a durable high quality clear top coat to seal and protect the polish. This will add shine and help your manicure last longer.
Remember to take your time and be patient when applying the polish. Practice will help you improve your technique and achieve a beautiful French tips manicure at home.
How to Step Up Your French Tips at Home Nail Game
There are several beautiful added effects that you can combine with French tips to enhance your at home manicure. Here are a few options:
- Nail Art Designs: French tip nails provide a perfect base for various nail art designs. You can get creative and add intricate patterns, geometric shapes, floral designs, or even simple dots and lines. Experiment with different colors, textures, and techniques to create unique and eye-catching nail art.
- Sheer Holographic Overlay: A sheer holographic overlay can add a stunning and ethereal effect to your French tip nails. Apply a sheer holographic nail polish over the entire nail or just on the French tip. The holographic particles will catch the light and create a mesmerizing rainbow effect.
- 3D Magnetic Special Effects: Magnetic nail polish with 3D effects can give your French tip nails a dimensional and captivating look. After applying the French tip and allowing it to dry, apply a magnetic polish that contains metallic particles. While the polish is still wet, hold a nail polish magnet over the nail to create unique patterns and designs.
- Glitter or Metallic Accents: Adding a touch of glitter or metallic accents to your French tip nails can instantly elevate the look. You can apply a glittery top coat over the French tip, create a gradient effect using glitter polish, or strategically place metallic nail studs or foils for added glamour.
- Ombre or Gradient Effect: Instead of using a solid color for the French tip, you can create a gradient or ombre effect by blending two or more colors together. This can be done using a sponge or a specialized ombre brush to create a seamless transition between the colors.
Remember to seal your manicure with a durable high shine top coat to protect the design and make it last longer.
Don't be afraid to think outside the box — Get creative and experiment with different combinations of effects to achieve a unique and personalized French tip nail design!

